
Authentication and Permissions
GitHub OAuth
Superlayer supports logging users in with their GitHub account. GitHub uses OAuth 2.0 for authentication, which provides a secure way for users to sign in without sharing their passwords.
Choose the option that sounds best to you, and the rest of the document will show you how to add Sign in with GitHub to your app.
Building for Web?
Building for React Native?
#Overview
There are three main steps:
- GitHub Developer Settings: Create an OAuth App.
- Superlayer Dashboard: Connect your OAuth App to Superlayer.
- Your app: Add code to log in with GitHub!
Let's dive deeper into each step:
#1. Create an OAuth App
- Go to your GitHub account Developer settings.
- Click on "OAuth Apps" in the sidebar.
- Click "New OAuth App" (or "Register a new application" if it's your first).
- Fill in the application details:
- Application name: Your app's name (users will see this)
- Homepage URL: Your app's website
- Authorization callback URL:
https://api.interfacedb.com/runtime/oauth/callback
- Click "Register application".
- After creation, you'll see your Client ID.
- Click "Generate a new client secret" to get your Client Secret.
#2. Connect your OAuth App to Superlayer
Add your OAuth App on Superlayer
From the Auth tab on the Superlayer dashboard:
- Click "Set up GitHub"
- Enter a unique name for your client (e.g., "github-web")
- Enter your "Client ID" from GitHub
- Enter your "Client Secret" from GitHub
- Click "Add Client"
npx @superlayer/cli@latest auth client add \--type github --name github-web \--client-id <id> --client-secret <secret>
And voila, you are connected!
#3. Add some code!
Method: Expo Web Auth
Superlayer comes with support for Expo's AuthSession library. To use it, you need to:
- Set up AuthSession
- Register your app with Superlayer
- Use AuthSession to log in with GitHub!
Let's do that.
Set up AuthSession
If you haven't already, follow the AuthSession installation instructions from the Expo docs.
Next, add the following dependencies:
npx expo install expo-auth-session expo-crypto
Update your app.json with your scheme:
{"expo": {"scheme": "mycoolredirect"}}
Register your app with Superlayer
Now that you have your App Scheme, it's time to tell Superlayer about it. For development with Expo, add exp:// and your scheme (e.g. mycoolredirect://) as redirect origins.
From the Auth tab on the Superlayer dashboard, add a redirect origin of type "App scheme".
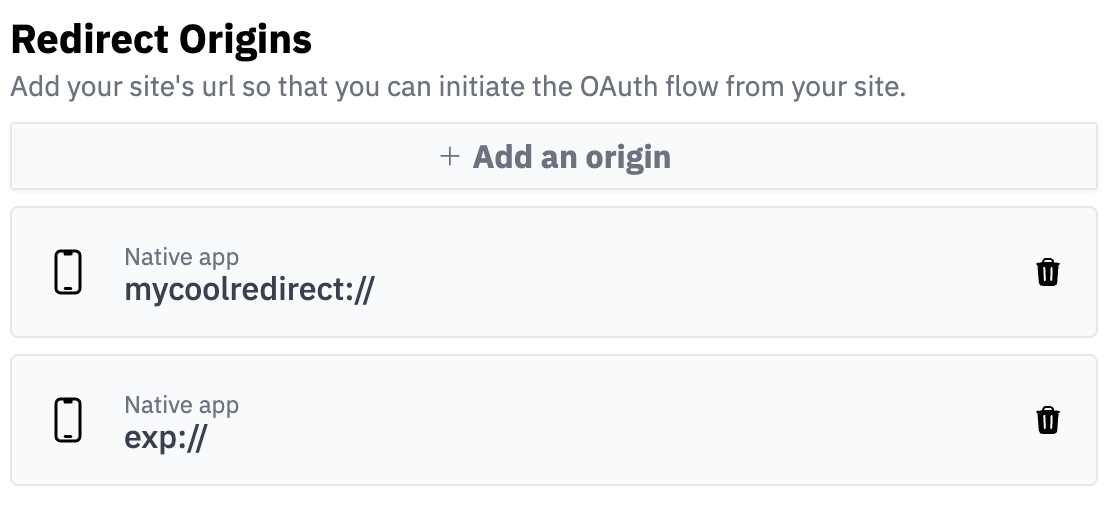
npx @superlayer/cli@latest auth origin add --type custom-scheme --scheme exp://npx @superlayer/cli@latest auth origin add --type custom-scheme --scheme mycoolredirect://
Use AuthSession to log in with GitHub!
And from here you're ready to add a login button to your Expo app! Here's a full example:
import { View, Text, Button } from 'react-native';import { init } from '@superlayer/react-native';import {makeRedirectUri,useAuthRequest,useAutoDiscovery,} from 'expo-auth-session';const APP_ID = '__APP_ID__';const db = init({ appId: APP_ID });function App() {return (<><db.SignedIn><UserInfo /></db.SignedIn><db.SignedOut><Login /></db.SignedOut></>);}function UserInfo() {const user = db.useUser();return (<View><Text>Hello {user.email}!</Text><Button title="Log out" onPress={() => db.auth.signOut()}></Button></View>);}function Login() {const discovery = useAutoDiscovery(db.auth.issuerURI());const [request, _response, promptAsync] = useAuthRequest({// The unique name you gave the OAuth client when you// registered it on the Superlayer dashboardclientId: 'github-web',redirectUri: makeRedirectUri(),},discovery,);return (<Buttontitle="Log in with GitHub"disabled={!request}onPress={async () => {try {const res = await promptAsync();if (res.type === 'success') {await db.auth.exchangeOAuthCode({code: res.params.code,codeVerifier: request?.codeVerifier,});}} catch (e) {console.error(e);}}}/>);}export default App;
#Scopes
GitHub uses OAuth scopes to control access. The basic scopes Superlayer requests are:
read:user- Read access to profile informationuser:email- Read access to email addresses